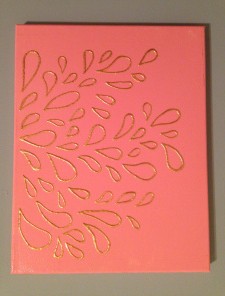
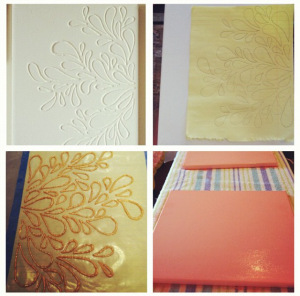
I was inspired to create this puff paint painting when I stumbled upon the Virginia and Charlie Blog via Pinterest (link below)
http://virginiaandcharlie.blogspot.com/p/my-projects.html
On the Virginia and Charlie Blog, she used a white canvas with a white design. I absolutely loved this design, I’m a sucker for all white as well as neutrals. However, my room has a bit more pink in it and I decided to try and make this project my own. I used white and red acrylic paint until I found the pink that matched my pillows. I paired my canvas with gold puff paint because I’m obsessed with anything that’s gold.
What You’ll Need:
- A canvas (you can choose any size you like!)
- Wax paper
- Mod Podge (you can get this at your local craft store or Wal-Mart)
- Puff Paint (you choose your color!)
- Acrylic Paint (you choose your color!)
- A paint brush (for acrylic paint)
- A foam brush (for Mod Podge)
- A plastic cup (to pour your Mod Podge in)
- A piece of blank computer paper
- A pencil
Step 1: Create a design — I copied the design I found on the Virginia & Charlie Blog. Draw your design with a pencil onto your piece of blank computer paper. You can create any design you want! I would recommend keeping it fairly less-complicated.
Step 2: Once you have drawn your design onto your computer paper, place a large piece of wax paper over your computer paper and, with your pencil, trace your design onto the wax paper.
Step 3: After you have traced your design onto your wax paper, get your puff paint ready! I made sure I had a small dry paper towel and a slightly damp paper towel just in case there was any mess-ups! Puff paint tends to splatter or “burp” sometimes…and I am a crazy, huge perfectionist. Trace your pencil marks on your wax paper with your puff paint let it dry! The puff paint needs quite some time to dry, especially if you made your lines thick. Which FYI draw your lines pretty thick! Thin lines are hard to peel off and sometimes break (you’ll find out).
Step 4: While you’re letting your puff paint dry, you can mix up your acrylic paint (if you’re using two colors) to pick out the color you want to paint your canvas. Once you have your color, paint your canvas, then let it dry…this will take a while. You can paint your canvas any color, even a pattern! Get creative!!
Step 5: This is the fun part…at least for me it was, I’m as easily entertained as a child. Once your puff paint is completely dry (you can lightly touch the edges to see if it’s dry) peel your puff paint design off of the wax paper and place it onto your canvas (once your canvas is completely dry). Place your puff paint design where you want it to be on your canvas.
Step 6: Once you have placed your design in its proper place on your canvas, pour your Mod Podge into a small plastic cup so that it’s easier to dip your foam brush into. Then, dip your foam brush into your Mod Podge, pick up one of your puff paint designs, paint a thin layer of Mod Podge onto your canvas, and then place your puff paint design onto the wet area. Repeat this glueing process until your design is completely glued onto your canvas! Then wait for it to dry. Once my entire die sign was completely dry, I planted over it with a thin layer of Mod Podge so that it would all stay in place!
Hope you love your Puff Paint Painting as much as I do! It’s such a fun and easy craft! You can paint a design or write a quote, the options are endless! I can’t wait to make more for my apartment.
xoxo, Megan

